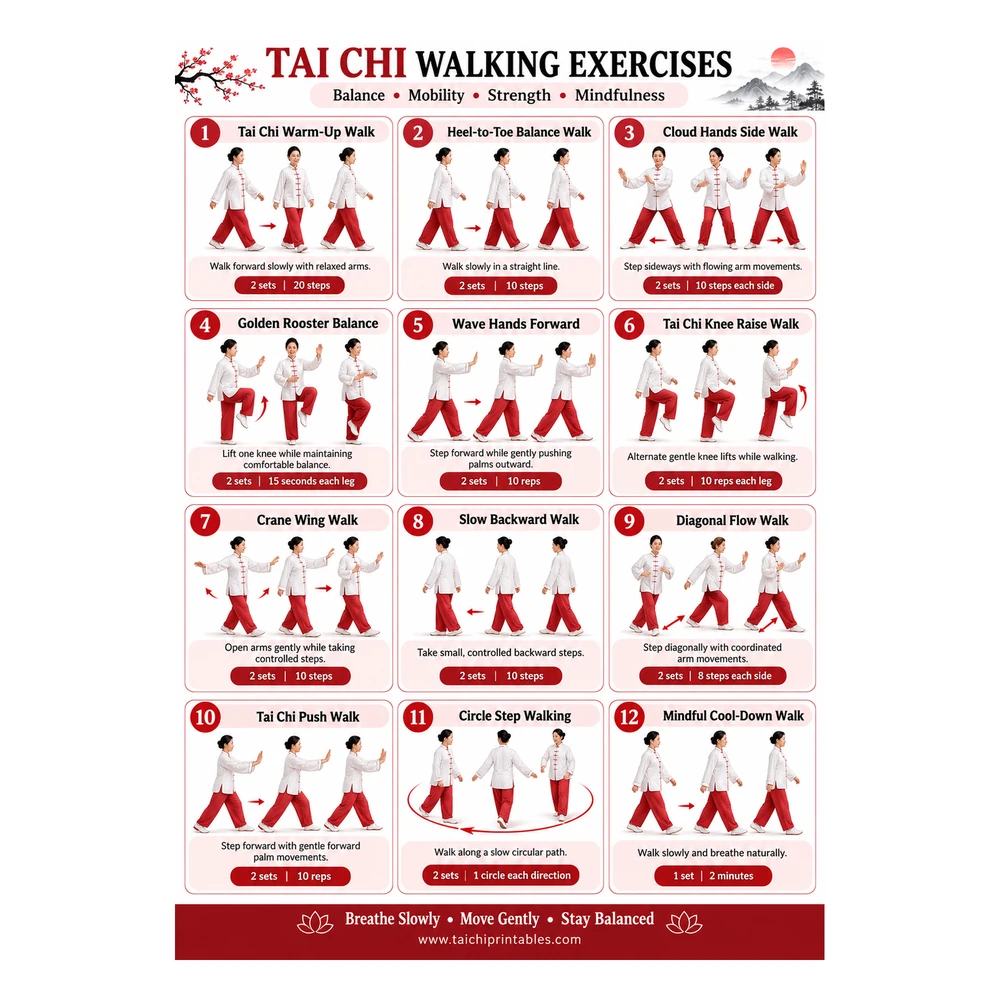

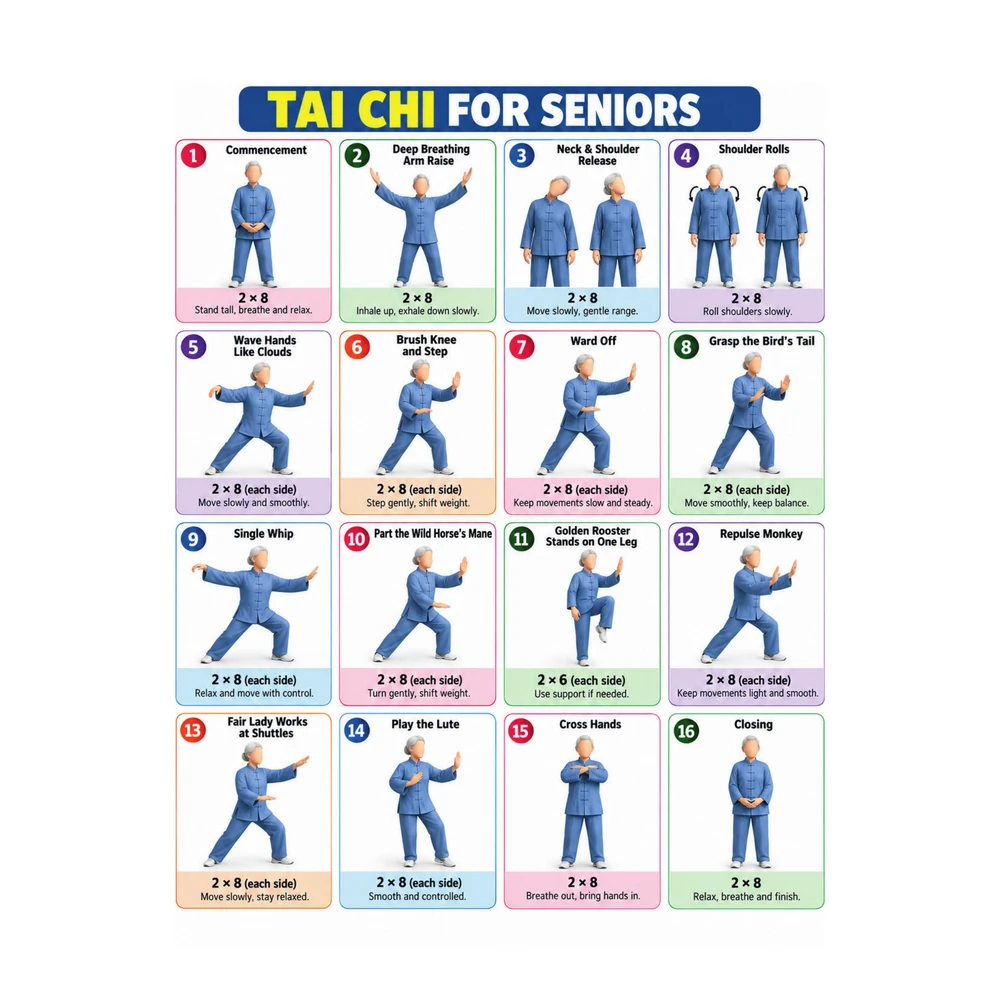
A tai chi workout does not need to be fast, complicated or physically demanding. It is a series of slow, controlled movements that combine gentle weight shifts, relaxed arm movements and steady breathing. For seniors and beginners, practising at home can be a comfortable way to become familiar with the basic movements and develop a routine at your own pace.
In this guide, you will follow a complete beginner-friendly session, from the first warm-up movements to the final closing form. You will learn six traditional tai chi movements, with clear instructions for your feet, legs, arms and breathing. Take your time with each one. The aim is not to memorise everything in one session, but to understand the movements and practise them comfortably.
What Does a Tai Chi Workout Session Look Like?
A tai chi workout usually has three parts: a warm-up, the main movements and a cool-down. Each part has a different purpose, and together they create a session that feels organised rather than rushed.
For a beginner, a session of around 15 to 25 minutes can be a manageable starting point. You can make it shorter while learning the movements or take more time when you need extra breaks.
1. Warm-Up: About 3–5 Minutes
Begin with gentle movements that help you settle into the session. You might loosen your shoulders, move your ankles, gently turn your upper body and practise shifting your weight from one foot to the other.
Keep the movements small and comfortable. The warm-up is not a separate workout that needs to be tiring. It is simply a chance to prepare your body and become aware of your posture and breathing.
2. Main Movements: About 10–15 Minutes
The main part of this session includes six tai chi movements:
- Commencing Form
- Part the Wild Horse’s Mane
- Brush Knee and Step
- Play the Lute
- Repulse Monkey
- Grasp the Bird’s Tail
Practise each movement slowly, pausing when you need to remember the foot position or arm path. You do not need to connect every movement smoothly on your first attempt.
3. Cool-Down and Closing: About 2–5 Minutes
Finish with gentle movements and relaxed breathing. Gradually bring your arms down, settle your feet and return to a comfortable standing position.
The closing form gives you a clear end to the session. It also provides a moment to notice how you feel before returning to your usual activities.
A Short Tai Chi Warm-Up
Before practising the main movements, give yourself a few minutes to settle into a comfortable standing position. Wear clothing that allows you to move easily and choose shoes or bare feet according to what feels safe on your floor.
Step 1: Settle Your Standing Position
Stand with your feet about shoulder-width apart. Keep your knees soft rather than locked, and allow your arms to rest beside your body.
Look straight ahead and let your shoulders relax. If you feel unsteady, stand beside a sturdy chair and keep one hand near it for support.
Step 2: Relax Your Shoulders
Slowly lift both shoulders towards your ears, then gently roll them backwards and down. Keep the movement smooth and avoid making large circles.
Repeat a few times, then allow your arms to rest naturally. Notice whether your neck and shoulders feel more relaxed.
Step 3: Gently Move Your Ankles
Keep one foot on the floor and lift the other foot slightly, if comfortable. Make a few small ankle circles in one direction, then change direction.
Place the foot down and repeat on the other side. You can hold a sturdy chair while doing this if you need extra support.
Step 4: Practise Gentle Weight Shifts
Stand with both feet flat and your knees relaxed. Slowly move a little more of your weight towards your right foot without lifting the left foot.
Return to the centre, then shift gently towards your left foot. Keep your upper body upright and avoid leaning sideways.
Step 5: Add Comfortable Arm Movements
Let your arms hang beside you. Slowly bring both hands forward to about waist or chest height, then lower them again.
Keep your elbows soft and your shoulders relaxed. Breathe naturally as you move.
For more warm-up ideas, see our tai chi warm-up routine.
6 Main Tai Chi Movements to Practise at Home
The following movements are presented as individual beginner exercises. Traditional tai chi forms can vary in their details and transitions, so treat these instructions as a simple introduction rather than a complete description of every style.
Practise each movement on its own before trying to connect them. If a step feels difficult, make the movement smaller or use a comfortable standing position instead.
1. Commencing Form (The Opening Movement)
Commencing Form is the opening movement in many tai chi sequences. It introduces a relaxed standing position and a slow, coordinated movement of the arms.
Step 1: Begin with your feet together.
Stand upright with your feet close together and your arms resting beside your body. Keep your knees soft and your gaze forward.
Step 2: Step your feet apart.
Take a comfortable step sideways with your left foot so your feet are about shoulder-width apart. Keep both feet pointing forward and distribute your weight evenly.
Step 3: Relax your arms.
Allow your shoulders to settle and keep your hands relaxed. Take a comfortable breath without forcing your chest upwards.
Step 4: Raise both arms.
Slowly bring both arms forward and upwards. Keep your elbows slightly bent and let your palms face down as your hands rise towards shoulder height.
Step 5: Lower your hands.
Gently bend your knees a little as your hands move down in front of your body. Keep the movement small, with your back upright and your heels on the floor.
Step 6: Return to the starting position.
Straighten your legs to a comfortable standing position as your hands settle in front of your lower abdomen. Let your arms relax without dropping them suddenly.
Step 7: Breathe naturally.
Breathe comfortably throughout the movement. Many beginners find it helpful to breathe in as the arms rise and breathe out as they lower, but do not force the timing.
2. Part the Wild Horse’s Mane
Part the Wild Horse’s Mane combines a gentle forward step, a weight shift and coordinated arm movements. It is often practised on both sides.
Step 1: Begin in a comfortable standing position.
Stand with your feet about shoulder-width apart, knees soft and arms relaxed. Keep your weight evenly distributed.
Step 2: Prepare your hands.
Bring your hands in front of your lower abdomen. Hold them as though you are gently carrying a light ball, with one hand above the other.
Step 3: Shift your weight.
Move your weight gradually onto your right foot. Keep your left foot light so you can step forward without rushing.
Step 4: Step forward with your left foot.
Place your left foot a comfortable distance in front of you. Let the heel touch first, then settle the foot onto the floor.
Step 5: Separate your arms.
As your weight moves towards the left foot, bring your left arm forward and slightly upwards, with the palm facing inward. At the same time, move your right hand down and backwards near your hip.
Step 6: Finish the weight shift.
Allow your weight to move towards the front leg without forcing your knee forward. Keep your upper body upright and your shoulders relaxed.
Step 7: Return and practise the other side.
Shift your weight back towards the rear foot, bring your hands together in front of your body and prepare to repeat with the right foot stepping forward. Keep the movements slow and controlled.
3. Brush Knee and Step
Brush Knee and Step combines a forward step with a gentle sweeping movement of one hand and a forward movement of the other. The arm and leg movements should feel coordinated rather than rushed.
Step 1: Stand with your feet comfortably apart.
Begin upright with your knees relaxed and your hands resting near your waist. Keep your eyes looking forward.
Step 2: Prepare your arms.
Bring your left hand upwards in front of your chest, with the palm facing inward. Keep your right hand near your waist, ready to move forward.
Step 3: Shift your weight backwards.
Move your weight gently onto your right foot. Allow your left foot to become light while keeping it in contact with the floor if that feels more stable.
Step 4: Step forward with your left foot.
Place your left foot ahead of you, beginning with the heel. Settle the foot carefully and keep your stance comfortable.
Step 5: Brush your left hand down.
As your weight begins to move forward, guide your left hand down and across the front of your left knee, as though gently brushing past it.
Step 6: Extend your right hand forward.
At the same time, bring your right hand forward from your waist. Keep the elbow slightly bent and the palm facing forward.
Step 7: Complete the movement.
Allow your weight to settle towards the front foot without leaning your upper body forward. Return your hands towards the centre, shift your weight back and prepare to practise the other side.
4. Play the Lute
Play the Lute is a balanced-looking tai chi position in which the hands are held in front of the body, one above the other. It is often used as a transition between movements.
Step 1: Begin in a comfortable stance.
Stand with your feet apart and your knees soft. Keep your arms relaxed and your gaze forward.
Step 2: Shift your weight backwards.
Move most of your weight gently onto your rear foot. Allow the front foot to become light while keeping it close to the floor.
Step 3: Adjust your front foot.
Bring the front foot slightly backwards or allow its heel to remain lightly in contact with the floor, depending on your balance and comfort.
Step 4: Raise your hands.
Bring both hands in front of your chest. Keep one hand slightly higher than the other, with the palms facing towards one another as though holding a small instrument.
Step 5: Relax your elbows.
Keep your elbows softly bent and your shoulders lowered. Avoid lifting your hands so high that your neck and shoulders become tense.
Step 6: Settle into the position.
Keep your weight mostly on the rear foot and your upper body upright. Let your eyes look ahead.
Step 7: Return slowly.
Lower your hands towards your waist and place your front foot comfortably on the floor. Shift your weight evenly before moving on.
5. Repulse Monkey
Repulse Monkey uses a backward stepping pattern with alternating arm movements. Beginners should use small steps and keep a chair nearby if they are unsure about stepping backwards.
Step 1: Stand with your feet comfortably apart.
Keep your knees soft and your arms relaxed in front of your body. Make sure there is clear space behind you.
Step 2: Prepare your hands.
Raise your left hand in front of you, around shoulder height, with the palm facing forward. Bring your right hand near your waist with the palm facing upwards.
Step 3: Shift your weight forward.
Move your weight gently onto your left foot. Keep the right foot light and ready to move.
Step 4: Step backwards with your right foot.
Move your right foot a short distance backwards. Place it carefully, starting with the toes or a gentle whole-foot placement according to your comfort and the version you are learning.
Step 5: Move your arms in opposite directions.
As the right foot steps back, bring your right hand forward and guide your left hand down and backwards. Keep both elbows slightly bent.
Step 6: Shift your weight onto the rear foot.
Gradually move your weight towards your right foot. Keep your torso upright and avoid leaning backwards.
Step 7: Repeat on the other side.
Prepare your hands again, shift your weight and step backwards with your left foot. Alternate sides slowly, using a small step and maintaining a comfortable stance.
6. Grasp the Bird’s Tail
Grasp the Bird’s Tail is a sequence of connected actions commonly described through several parts: Ward Off, Roll Back, Press and Push. The movements use gentle weight shifts and coordinated arm positions.
Step 1: Begin with a comfortable stance.
Stand with your feet apart and your knees relaxed. Bring your hands in front of your lower abdomen, as though holding a light ball.
Step 2: Shift your weight and step forward.
Move your weight onto your rear foot, then take a comfortable step forward with the other foot. Set the heel down carefully before transferring your weight.
Step 3: Practise Ward Off.
As your weight moves towards the front foot, raise your front arm in a rounded position in front of your chest. Keep the other hand near your waist. Avoid locking your elbow.
Step 4: Practise Roll Back.
Gently shift your weight towards the rear foot. Guide both hands across the front of your body in a rounded, sweeping movement, as though following a soft curve.
Step 5: Practise Press.
Bring your hands together in front of your chest, one palm resting lightly behind the other hand or wrist. Move your weight gently forward while keeping your elbows relaxed.
Step 6: Practise Push.
Bring your hands towards your chest, then extend them forward in a gentle pushing action. Let your weight move towards the front foot without leaning your body forward.
Step 7: Return to a comfortable position.
Shift your weight back towards the rear foot and lower your hands. Settle both feet comfortably before repeating or moving on.
Take your time with this sequence. You can practise each part separately before trying to connect them into one continuous movement.
Gentle Cool-Down and Closing Form
The cool-down is a chance to slow down and finish your session calmly. You do not need to repeat the main movements or stretch deeply.
Step 1: Return to a Comfortable Standing Position
Stand with your feet about shoulder-width apart. Let your arms rest beside your body and allow your knees to soften.
If you feel unsteady, stand beside a sturdy chair and use it for support.
Step 2: Relax Your Shoulders
Gently lift your shoulders and allow them to settle down again. Keep your neck relaxed and avoid making large or forceful movements.
Step 3: Lower Your Arms Slowly
Bring both hands forward to about waist height, then gently lower them towards your sides. Keep your elbows soft and your breathing comfortable.
Step 4: Take a Few Relaxed Breaths
Stand quietly and breathe at a natural pace. Avoid taking exaggerated breaths or holding your breath.
If you want more guidance on coordinating breathing with gentle movement, see our guide to tai chi breathing for beginners.
Step 5: Complete the Closing Form
Bring your hands gently in front of your lower abdomen, one resting over the other if comfortable. Allow your arms to relax, then return your hands to your sides.
Bring your feet together slowly if that feels steady. Otherwise, keep them comfortably apart and finish in a relaxed standing position.
How to Build a Tai Chi Workout Habit
Learning tai chi is a gradual process. You do not need to complete a long session every time you practise. Short, regular sessions can give you more opportunities to become familiar with the movements.
Start with Just a Few Movements
Begin with the warm-up and Commencing Form. Once you feel comfortable with those, add one or two of the main movements.
There is no need to learn all six at once. Repeat the movements you already understand before adding something new.
Choose a Convenient Time
Try practising at a time that fits naturally into your day. Some people prefer a quiet morning session, while others find an afternoon practice more convenient.
Choose a time when you are not rushed and have enough space to move safely.
Keep Your Sessions Manageable
A short session may be enough while you are learning. You can gradually spend more time practising as you become familiar with the movement sequence.
Take breaks when needed. If you lose track of the steps, return to a comfortable standing position and begin again slowly.
Explore Other Movements Gradually
Once you are comfortable with the six movements in this guide, you may want to learn other parts of tai chi. For example, Wave Hands Like Clouds is another well-known movement that involves gentle side-to-side weight shifts and coordinated arm motions.
You can also explore the White Crane Spreads Its Wings movement in a separate guide rather than trying to add too many new steps to one session.
Safety Notes for Practising at Home
Choose a clear, level floor with enough room to step forward, backwards and sideways. Remove loose rugs, clutter and anything that could catch your feet.
Keep a sturdy chair nearby, especially when learning weight shifts or backward steps. You can use it for support when needed, and there is no need to practise without assistance if you feel unsteady.
Wear comfortable clothing and suitable footwear for your floor. Avoid forcing your knees into deep bends or taking steps that feel too large.
Move slowly and breathe normally. If you feel dizzy, stop, sit down somewhere safe and allow yourself time to recover. Stop the session if anything hurts or feels uncomfortable. If you have concerns about whether tai chi is suitable for you, speak with a healthcare professional before beginning.
Frequently Asked Questions
1. Is Tai Chi a Good Workout for Beginners?
Tai chi can be a suitable movement practice for many beginners because its movements are generally slow and controlled. You can start with simple positions, small steps and short sessions. Choose a version that matches your comfort and balance, and use support when needed.
2. How Long Should a Beginner Tai Chi Workout Last?
A beginner can start with a short session of around 15 minutes, including a warm-up and cool-down. You can shorten the session while learning the movements or take longer breaks. The important thing is to practise at a comfortable pace rather than trying to complete a particular duration.
3. Can Seniors Practise Tai Chi at Home?
Many seniors practise tai chi at home, provided they have a suitable space and choose movements that match their abilities. Keep the floor clear, have a sturdy chair nearby and avoid steps that feel difficult to control. A qualified instructor can help you learn the movements and adapt them when needed.
4. Do I Need to Memorise the Whole Tai Chi Sequence?
No. You can learn one movement at a time. Begin with Commencing Form, then gradually add the other movements as you become familiar with their foot positions and arm paths. It is perfectly reasonable to refer to written instructions while practising.
5. Should I Breathe in or Out During Tai Chi Movements?
Breathing should remain natural and comfortable. Some people find it helpful to breathe in during an opening or rising movement and breathe out as their arms lower or their body settles. However, there is no need to force a strict breathing pattern. Avoid holding your breath.
Make Tai Chi Part of Your Routine
A tai chi workout at home can begin with just a few simple movements. Learn the opening form, practise gentle weight shifts and add the main movements gradually. Give yourself time to understand each step, keep your breathing comfortable and finish with a calm closing form. With patience and a manageable routine, you can build a practice that fits naturally into your day.